AdamTheTech Logo
AdamTheTech
Enthusiast of Technology, Web Development, and Sci-Fi

Microsoft’s Free Virtual Machine Images

Deus Ex: Human Revolution Review

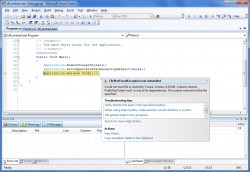
Embed dll Files Within an exe (C# WinForms)

What’s in a Google Cookie? Can They Track Me Online?

During the mid to late ‘90s, I remember the common treatment towards browser cookies at the time was to set your browser to not accept any cookies at all.  “They are evil”, “They contain private/personal information”, “They will damage your computer” were some of the more common statements at the time.  For the most part, cookies are small text files that are stored on a user’s hard disk by a web site’s server, allowing the web site to later retrieve it if needed.

Cookies store web site preferences, login information/status, and other temporary information.  On their own, they can’t really do anything.  Most of the time, you can get by without them, but as a result, you will lose the benefits of saved preferences.  Websites simply store data pertinent to their specific website inside the cookies, then may request to read it back at a later date when you revisit the page.  HowStuffWorks.com offers a more in-depth explanation of how cookies work in general.

Yes, cookies can contain information that can give clues to what sites you visit, what searches you perform, and what kinds of items you may place in your amazon or newegg shopping cart or wish list.  But for the most part, if you delete those cookies, the record of your surfing preferences vanishes from the workstation.

Cookies can keep track of how many times a specific workstation accesses a website (the cookie may contain a unique ID number).  Once you visit a website, it checks to see if it has previously stored a cookie on your computer with a unique ID in it (and checks to see what saved preferences you had so they can be loaded).  If it sees the cookie, the web server logs you as a repeat visitor.  If not, the website creates a new cookie for you with a new ID number and logs you as a new unique visitor.

Since cookies are meant to be convenient places to store data related to the websites you visit for a temporary amount of time. There are, however, a few situations where your surfing habits and search terms do not vanish into obscurity.  Here’s how to keep your searches and surfing habits fairly anonymous:

Do not login to a search engine site and perform a search.  If you have a username associated with any search sites (yahoo, google, etc), don’t log in to perform your search.  They can (and probably will) associate your searches with your username.

Do not search using your ISP’s search engine. They can track your movements far better because you are signed onto their network with a username in the ISP’s database.  This means AOL, Verizon, NetZero, etc.

Do not enter personal information in a search box. Your name, address, phone number, social security number, bank account number, credit card number, etc.  That just is not a smart thing to do.  This is how people were tracked down in the recent AOL search data release (however, I’m not saying that any other search engines release their data haphazardly).  Either way, this should be common sense.  What you’re effectively doing is passing a post-it note to a stranger with your information on it.

Block/Filter Cookies. You can block cookies from websites, and you can filter them to accept/block them from specific websites.  In Opera, you can filter cookies or anything else by going to “Tools” > “Preferences” > “Advanced” tab > “Content”.  In Firefox, there is an extension called CookieSafe that you can use, plus another extension called CustomizeGoogle, which does much more than just handle Google’s cookies.

If you’re paranoid about cookies, what you can do is try to block everything first, then accept cookies from specific sites that you trust and need cookies to operate correctly (ie, newegg’s wish list).

Remove backtracking & link redirects. Google uses redirect links within their search results.  I’m sure if you use RSS feeds, you may see something similar with feedburner, or some other RSS service.  That is how they go about tracking the number of hits and collecting various browser data.  Here’s a good explanation and way of preventing google backtracking.

Clear your browser cache, history, cookies, and form fields. Opera and Firefox have the option to dump everything on demand or on exit.  With IE, it has to be done manually in separate places

IE6
Go to “Tools” > “Internet Options”.  On the “General” tab, click “Delete Cookies”, “Clear History”, and “Delete Files”.  These may take a bit of time to finish.  Next, go to the “Content” tab, click the “AutoComplete” button, and click “Clear Forms” and “Clear Passwords”.

Opera
Go to “Tools” > “Delete Private Data”.  Make sure you check/uncheck what you want to clear.  There is an option in there that will close all of your open tabs, so uncheck that if you want to save any.

To dump history, cache, and cookie data upon exit, simply go to “Tools” > “Preferences” > “Advanced” tab.  In the “History” section, check the box labeled “Empty on exit”, and in the “Cookies” section, check the “Delete new cookies when exiting Opera” option.

Firefox
Go to “Tools” > “Clear Private Data”.  Make sure you check/uncheck what you want to clear.  Your tabs will stay open by default, unlike Opera.

To dump history, cache, and cookie data upon exit, simply go to “Tools” > “Options” > “Privacy” tab, and click the “Settings” button on the lower right.  Check the items you want dumped upon exit, and check the “Clear private data when closing Firefox” option.

You can use a proxy to forward traffic through.  Now, on one hand, this allows you to disassociate your internet traffic from the IP address your ISP gives you.  Tor, run by the EFF, is one such publicly available proxy service.  There are other various ones up and running as well.

The downside to using a proxy server is that even though your net traffic is disassociated from your IP address, some proxies log the data you send and request through it.  It’s more or less a catch-22 in terms of attempting to attain absolute privacy (who do you want logging your data?).  But of course, there are a few proxy servers with strict privacy polices.

Keep your computer free of spyware/adware/malware.  This is probably one of the largest areas of illegitimate use of your surfing habits, search terms, and whatever other private information that these kinds of software can gather.  The tried and tested tools of the spyware prevention trade include Spybot, Adaware, HijackThis!, and Spyware Blaster (plus, there are some people who prefer Windows Defender, but others claim it’s full of too many annoyances to use).  Proper firewall and anti-virus protection goes a long way too.

Anyway, we started out here interested in deciphering the data that is being stored inside of a google cookie.  So, here’s an example of what you would see if you opened one of google’s cookies:

PREF
ID=cb0ba67602420705:TM=1156552394:LM=1156552394:S=A-mJgF4C-9P_HdxF
google.com/
1536
2618878336
32111634
3033578544
29804711
*

Gobbledygook, right?  Not quite.  There is some information you can glean from the contents of this cookie.  Using a browser to read the cookie (Opera and Firefox have this ability) often results in showing what all of this says.

PREF is the name of the cookie, which most likely stands for “preferences”.  google.com is the domain from which the cookie came from.  So, putting two and two together, a preference that may be stored for google’s webpage is which language that you want google.com to appear in.

The ID value is a unique identifier that allows the server to keep track of various preferences and hit traffic for your browser session.  Something that would be kept track of would be to see how popular a certain new google service is.  Do people hate it so much that they only visit once and leave, or do they like it and visit it several times?

The cookie can also store the expiration date of the cookie (the point at which it is no longer useful and will be ignored by the website’s server), and possibly the date of your most recent visit to the website.

By itself, it really doesn’t store much in the way of personal information…just site preferences and the like.  All the real tracking happens on the web server itself.  Take a look at this official google blog post that offers a basic explanation of their cookies and what information is gathered on by the web server .  In short, it can log your IP address, what type of browser you’re using, what Operating System you’re using, the date and time you accessed the website, and the unique ID of the cookie that was stored on your computer.

Now, if you put some of that information together, you can probably find out a few things about the user that was surfing the website.  The two identifiable portions of this are of course the IP address and the cookie’s unique ID.  Between those two pieces of data, it’s possible to perform a correlation and match unique IDs to several IP addresses (if your IP address changes), or a single IP address to several cookie IDs (which may or may not be very accurate since different people can use the same IP address at different times, depending on how their ISP distributes IP addresses).  Essentially, tracking users by this method is not very accurate.

On the other hand, if you login to google’s website with your username and password, they will be able to track you with greater ease, seeing as they would be able to log every IP address you log in from, every cookie that is sent to you, and every search you perform.  The log results on a particular user in that case would then provide useful information when put all together, such as being able to provide targeted ads that are geared towards your interests.  Or, on a more sinister note, they could be used in the way AOL’s search data was used–to correlate all the search data and find out who the person was that actually performed the searches as a result of what they themselves entered in the search box.

As I mentioned earlier, there are a few ways to guard yourself from active tracking methods like this.  It may be a good idea to adopt a few of them into your “safe surfing” habits, but other than that, the only way to be 100% anonymous on the Internet is to cut your ethernet cable and bury your computer in concrete.

Ultimately, it’s your actions and critical watch over your own personal information that dictates what others can and can’t find out about you (seriously, who enters their credit card number in a google search, anyway?  That alone should be common sense, but if it isn’t, now you know that it is not a very smart thing to do).

The danger in being tracked online isn’t really about cookies…it’s about what you do online.

(Originally published on a now-defunct blog)

NOTICE: Apple Battery Recall

First Dell, now Apple. Last week Dell was in the headlines for a massive notebook battery recall of 4.1 million batteries. Apple just stepped up to the plate 10 days later with a battery recall totaling 1.8 million batteries. As with Dell’s recall, Sony batteries are at fault. The recall appears to only affect Apple laptops with IBM PowerPC chips, and not Apple’s line of Intel-based laptops.

12″ iBook G4’s, 12″PowerBook G4’s and 15″ PowerBook G4’s sold in the United States from October 2003 through August 2006 are among the affected laptop models. Apple instructs users to stop using the batteries immediately and to run the laptop from AC power only because, like with Dell’s faulty batteries, Apple’s batteries on the recall list have been proven to overheat and have caused minor burns and property damage. Be sure to check Apple’s battery recall page or call their toll-free number at 1-800-275-2273.

(As of Thursday afternoon, I’ve been unable to access the Apple webpage. It is most likely due to a surge of traffic to their site.)

Here are the affected models and serial numbers:

Laptop Model Battery Model Number Serial Number Range
12″ iBook G4 A1061 ZZ338 – ZZ427
3K429 – 3K611
6C519 – 6C552 ending with S9WA, S9WC or S9WD
12″ PowerBook G4 A1079 ZZ411 – ZZ427
3K428 – 3K611
15″ PowerBook G4 A1078 & A1148 3K425 – 3K601
6N530 – 6N551 ending with THTA, THTB, or THTC
6N601 ending with THTC

Addendum (10:36PM EST): Apple’s site appears to be back up and running. I’ve updated the above chart accordingly since Apple appeared to have added a few serial number ranges since the initial announcement.

I also thought I should mention that like with the Dell battery recall, the batteries found in these Apple laptops will be replaced free of charge. Start out by filling out the forum on the right hand side of Apple’s battery recall page.

(Originally published on a now-defunct blog)

Convert Files to PDF

PDF (Portable Document Format) files can be fairly useful.  They’re standardized so that no matter what Operating System or reader software you use, they are all displayed in the same way (you can use FoxIt, Sumatra, or Adobe Reader).

For instance, if you have an MS Word document, but the person you need to show it to does not have MS Office or OpenOffice, then converting to a PDF may be the perfect solution because PDF readers are free.

So, here’s a few ways you can convert documents to PDFs without having to shell out $30 or more (in other words: free).

One of my personal favorites is PrimoPDF, found here: http://www.primopdf.com/

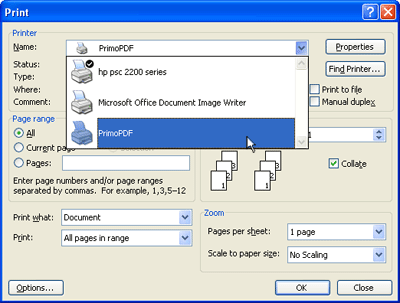
Basically, it installs itself as a printer, so whenever you go to print something, all you have to do is change the printer via the drop down menu in the Print window to “PrimoPDF”. Just hit print, and it will ask where you want the PDF saved.  Choose a location, save it, and your PDF file will be ready to go.

If you’re not satisfied with PrimoPDF, CutePDF Writer works in much the same way, and is available here: http://www.cutepdf.com/ You will need to download both the CuteWriter and the Free PS2PDF Converter:

If you’re away from your home computer and need to convert a file to PDF, but can’t or don’t want to install a PDF converter on the workstation you’re using, here’s an easy *online* converter you can use: http://www.pdfonline.com/convert_pdf.asp Basically, PDF Online allows you to upload any one of many common text or image files, and have the final PDF file emailed to you.

Notice that you will actually be uploading the file you wish to convert, and it’s possible that both your file and the generated PDF may be viewed by the site staff/programmers to “ensure quality control”, as it was mentioned on another online PDF converter service (in other words, it may not be wise to use online converters for “sensitive” documents).

All of these PDF converters produce clean PDF files so that no extra advertising garbage appears in the final PDF file.

Lastly, PDFs are especially useful for sending resumes, when you don’t know what the recipient has in terms of software, so they may not be able to open up older/newer MS Office or OpenOffice files.  Sending a resume in PDF format also speaks professionalism and goes to show you are tech savvy as well.  Whenever I see a resume sent to me as a PDF, these are the things that I think about the sender before I even open their resume to look at it.  It’s certainly one way to put your best foot forward.

Just to show you that PDFs can be used anywhere, I’ve provided this “How-To” in a downloadable PDF file here.

(Originally published on a now-defunct blog)

Sans Digital MS2C1 Drive Enclosure Review

Introduction

External hard drive enclosures are quite handy to have these days. You can use them for backups, you can use them for transferring files, or you can even use them for general storage bins for some of your data (especially if you’re in to multimedia). The Sans Digital MobileSTOR Series MS2C1 drive enclosure is one such tool that is designed to house two drives in one small tidy unit, supporting both RAID striping and single/separate drive configurations (JBOD: Just a Bunch Of Drives). The MS2C1 was provided to us by Sans Digital for this thorough review, and currently retails for about $210 on Newegg.com.

Specifications

Boxed contents:

  • The MobileSTOR Series MS2C1 drive enclosure
  • Power cable
  • USB cable
  • FireWire 800 cable
  • 2 small zip lock bags (each with screws and plastic “keys” for each drive tray)
  • CD with NTI Shadow backup software
  • Pamphlet with instructions

MS2C1 Specifications:

  • 2 swappable 3.5″ Hard Drive trays
  • JBOD and RAID 0 (Striping) supported
  • Supports SATA I/II Hard Drives only
  • 1.5 TB (Terabyte) maximum total capacity; supports up to 750GB drives
  • 1x USB 2.0, 1x FireWire 400 (IEEE 1394a), 2x FireWire 800 (IEEE 1394b) Interfaces
  • Rear 40mm cooling fan
  • Internal 70W Power Supply
  • Hard Drive activity LEDs & power LED
  • 4.8″ W x 7.9″ D x 4″ H
  • 3.7 lbs
  • 1 year warranty

Note that neither the hard drives or FireWire 400 cable are included with the MS2C1.

Also note that so far, the FireWire 800 interface only appears to be available through select PCI expansion cards and on newer Mac desktops and laptops.

Initial Impressions

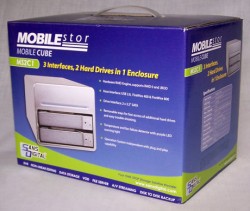
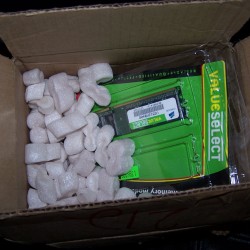
First off, here’s the box and the box’s contents as they arrived. The contents were packed well, so there’s little chance of anything getting damaged in transit.

Sans Digital MS2C1 Package

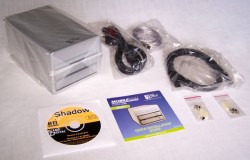
Sans Digital MS2C1 Package ContentsEverything you see in the photo was packaged in the box. This includes the MS2C1 enclosure itself, a power cable, USB 2.0 cable, FireWire 800 cable, two small ziplock bags (each with screws and plastic “keys” for each drive tray), a CD with backup software, and a pamphlet listing instructions, specs and other available Sans Digital hardware.

It was disappointing to discover that there was no FireWire 400 cable included with the MS2C1. This cable must be purchased separately if it is required. Both USB 2.0 and FireWire 400 have more or less become standard finds on mid-range to high-end PC motherboards, as well as most pre-built PCs, so it seems somewhat negligent to not include a FireWire 400 cable.

It was also surprising to discover that this drive enclosure only supports JBOD and RAID 0. Since the MS2C1 can hold two drives, it was half expected that RAID 1 (mirroring) would also be an optional RAID mode. For whatever reason, it was not–but it should be pointed out that relying on RAID 1 as the only means to backup a drive is not very reliable, which may have been (part of) the reason why RAID 1 was not included in this drive enclosure. Either way, if you have your heart set on RAID 1, the MS2UT drive enclosure supports RAID 0 and RAID 1, but not JBOD. The MS2UT comes with USB 2.0 and eSATA (external Serial ATA) interfaces.

It was curious to find that there were two FireWire 800 interfaces on the MS2C1 drive enclosure. The reason for the two interfaces was not apparent on Sans Digital’s website or the MS2C1’s instructions. We contacted Sans Digital about this detail, and they were able to shed light on the mystery. The additional 1394b interface can be used as a hub to daisy chain another 1394b device to the enclosure (so you don’t waste a FireWire 800 port on your laptop/desktop).

As for the hard drives, you can purchase just a single drive, or two drives. For the purposes of this review, two Western Digital Caviar RE WD3200SD (RAID-optimized 320GB, 8MB cache SATA I, 7200RPM) drives will be used. These drives are specially optimized and designed for use in RAID arrays, however, they will perform like regular Western Digital Caviar drives if used individually (i.e., under JBOD).

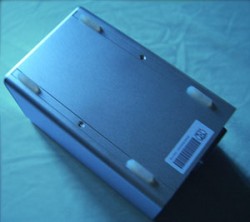
As for the enclosure itself, it’s fairly light and durable, so it will take a few drops and dings without ill-effect (however, I wouldn’t recommend dropping the enclosure after installing the hard drives). The enclosure is fairly small, and doesn’t look like it can actually hold two hard drives, but I assure you, it does. This unit can be easily stored on top of your tower or in some out-of-the-way nook, while also touting rubber feet so as not to scratch any surfaces it may rest upon.

Enclosure Bottom

Bottom of the Enclosure - notice the rubber feet

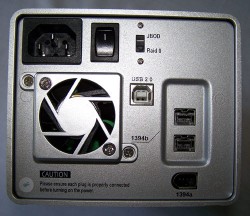
The rear of the enclosure - the interfaces, power socket, fan, RAID dip switch, and power switch

What to Do When a Damaged Package Arrives

I had the unfortunate experience of having to deal with a damaged package of parts I ordered from ZipZoomFly over a week ago.  Let me just say that although ZZF offers great deals and has regular “free shipping” offers, you don’t really know how that costs you until you have to deal with their support service.  Contrarily, this is where Newegg shines.  You may have to pay slightly more with Newegg (most notably with shipping), but I can honestly say I have no complaints about their service.  While newegg proudly carries a customer service rating (not overall store rating) of 9.39 out of 10 on resellerratings.com, ZZF sadly drags along at 4.28 out of 10.  Granted, ZZF did manage to get the issue sorted out in the end by issuing a full refund, but there is definite room for improvement (especially in the areas of a 2-3 day initial response and call-back/email-back time—once you have an RMA going, the response time is usually cut down to about a day or a day and a half).

Anyway, on to the meat of the action here.

What should you do when your package looks like it’s been drop-kicked, stabbed, sliced, or diced?  Refuse the delivery.

Ask the person making the delivery to make a report of the damage, then immediately notify the shipper that you refused the delivery and why (ie, damaged goods), and request a reshipment/replacement.  The package will be shipped back to the distributor, and they should send a replacement.  You should not be charged extra for this, although some less-reputable dealers will try to stick you with a restocking fee.  As long as you follow this basic procedure, you should not have to worry about it.

Just remember, by signing and/or accepting the package, you are thereby affirming that the condition of the shipping box is satisfactory.  If it so happens that nobody is home to accept the package and it is simply left at the door, call up the shipper and/or distributor immediately, and notify them of damage to the package (if you would not have normally accepted it), and they should come around to pick it up.

When you request that a package be sent back for reshipment/replacement, if it so happens that the part is no longer available from the distributor, they will usually offer a comparable product, offer to put your order on backorder, or offer to give you a refund (but depending on store policy, you may end up with store credit).

On the other hand, what you could do is simply accept the package, test the hardware you received, and keep your fingers crossed to see if it works–then cross them again if you have to call the distributor to complain about a dead part.  This way is a headache waiting to happen.  If you do take this road, notify the distributor IMMEDIATELY that you have received a defective/damaged/DOA product.  If done within a couple days, you should be alright, but any longer than that and things may not go your way seeing as the possibility of *you* causing the damage enters the picture after so much time has passed.

Again, if it looks like it might be damaged, refuse the delivery–even if you’re impatient to install a piece of hardware you’re expecting.  That way, the distributor can’t argue about *you* damaging it since you never handled it.  Furthermore, you *paid* for a product you expected to be brand new, not tossed around like a football on a sunny afternoon in the backyard with your buds.  After all, would you accept something off of the store shelf at Best Buy or Circuit City in that condition?

With that, I hope that all your packages arrive safe and sound, but in the rare cases that they don’t, you should now have a fairly good idea of what to do.

(Originally published on a now-defunct blog)

Create a Simple Backup System: Part III – Automating the Backup

Scheduling an automatic backup will be the last step in this series of the Simple Backup System (be sure to take a look at Part I and Part II before diving into this one).

Through the course of both articles, in order to perform a backup, you have needed to do it manually.  The downside to this?  You have to remember to actually do a backup.

So, what we’re going to do here now is a “set it, and forget it” kind of deal where stick the “full_backup.bat” batch file into Windows Task Scheduler.   The first thing to make sure of is if this service has been disabled or not.  To enable it, go to “Start” > “Run” > and type: services.msc

Look for an item named “Task Scheduler”.  Right click on it and click “Properties”.  Set the “Startup type” dropdown menu to “Automatic” and click the button labeled “Start” (if it isn’t already grayed out).  Hit OK and close the services window.

Now, here’s where the real magic begins.  Go to the Control Panel and open up “Scheduled Tasks”.  In the new window, double click on “Add Scheduled Task”.  You should be presented with a wizard.  Hit “Next”, and in the next screen, hit “Browse” to locate your “full_backup.bat” file.

On the next screen, you can choose how often to perform the backup.  Since the directories I backup using this method change daily, I schedule daily backups.  If you don’t wish to do daily backups, I would suggest either weekly or monthly (but encourage you to go weekly).  Hit “Next” when you’re done.

Selecting a time to do the backup is next.  It should be fairly self-explanatory.  Pick a time during the day (or night) for the backups to run.  If you keep your computer on all night, just simply schedule an hour when you know you’re not going to be using your computer.  Anywhere between 3AM to 5AM is usually a safe bet.  If you only have your computer on during the day, schedule the backup during lunch or dinner.  Hit “Next” when you’re done.

The next step is fairly important.  If your computer is not password protected, you can leave everything as-is here.  If it is password protected, for “user name”, enter the name of your computer, followed by a backslash and the username “Administrator”.  If you don’t know what the computer name is, right click on “My Computer”, click “Properties”, and click on the “Computer Name” tab.  You should see the name labeled with “Full computer name”.  So, here’s what you need to type:

ComputerName\Administrator

Now, just type in the password for the Administrator account in the password fields.  Hit “Next” and, finally, “Finish”.  Your automated backup should now be set!  To verify that it runs after a scheduled time, just open up “Scheduled Tasks” again and look under the “Last Run Time” column.

(Originally published on a now-defunct blog)

Create a Simple Backup System: Part II

You should have had the chance to give the “Create a Simple Backup System” a whirl by now, but if not, you should probably at least read it first because I’ll be pressing right ahead with the next step of the process: backing up multiple directories with one .bat file!

So, last time you should have created a single batch file that effectively backed up “My Documents” or another directory of your choosing.  If you’re anything like me, you probably have other things you would like to backup that may be scattered around your hard drive, such as your email and address book, pictures, bookmarks, and so on.

So, hold on to your hat, and here we go!

The idea behind the batch file is to automate tasks to save you doing everything by hand.  The easiest way to do that for the purposes of these backups is to make a separate batch file for each directory or file that is similar.  For instance, if you want to backup your bookmarks, it would be best to specify that you want all your bookmark files to be backed up at the same time and RARed into the same archive.  So, here’s an example of a backup file that will take care of IE, FireFox, and Opera:

@echo off
title bookmark backup
REM this is for IE6
<pre>XCOPY "C:\Documents and Settings\Adam\Favorites" "C:\backups\bookmarks\Documents and Settings\Adam\Favorites" /y/s/e/c/i
REM this is for FireFox - the "z35y4x8x.default" directory may be named something else on your computer
XCOPY "C:\Documents and Settings\Adam\Application Data\Mozilla\Firefox\Profiles\z35y4x8x.default\bookmarks.html" "C:\backups\bookmarks\Documents and Settings\Adam\Application Data\Mozilla\Firefox\Profiles\z35y4x8x.default\" /y/c/i
REM this is for Opera
XCOPY "C:\Documents and Settings\Adam\Application Data\Opera\Opera\profile\opera6.adr" "C:\backups\bookmarks\Documents and Settings\Adam\Application Data\Opera\Opera\profile" /y/c/i
REM this is to RAR everything and then delete the copies you made with the above commands
"C:\Program Files\WinRAR\WinRAR.exe" A -r -M3 -MD4096 -Y -O+ -EP -ac -isnd -vn -ep1 "C:\backups\bookmarks.rar" "C:\backups\bookmarks\*.*"
RMDIR "C:\backups\bookmarks" /q/s

Some of this should look somewhat familiar from last time.  IE6’s backup procedure is fairly straight forward.  Just copy the directory to your backup folder to be RARed later.

Next, we have FireFox’s bookmarks, which are contained inside an HTML file.  So, in order to copy that file, you must find out exactly where it is since the containing folder may be different on your machine.  Also, take note that the command switches at the end of that line are different.  This is so only the HTML file is copied, and not all the other files and sub directories.  Also note that the destination path must end with a backslash when copying an individual file.

Opera is much the same as FireFox.  Simply find where the opera6.adr file is located and use that path and the same command switches at the end.

Finally, the last two commands RAR everything together then delete the copies you made, leaving you with the RAR archive.

Neat, huh?

Alright, so no you should have “My Documents” being backed up with one batch file and your bookmarks with another.  How do you call them together so you can just double click on one batch file and let it run while you get a snack or coffee?

For the sake of this example, we’re going to call the My Documents backup file “my_docs_backup.bat” and the bookmarks backup file “bookmarks_backup.bat”

So, like in the beginning of the first backup article, create a new batch file, but name it “full_backup.bat”.  Place all three batch files into the “C:\\backups” directory.

This is going to be the “full_backup.bat” file you execute to get the other two to run.  Here’s what goes in it:

@echo off
title full backup

call "C:\\backups\\bookmarks_backup.bat.bat"
call "C:\\backups\\my_docs_backup.bat.bat"

The call command executes each batch file, but waits before the first one is done before moving onto the second.  In this fashion (with single-core CPUs, anyway), these backups are complete faster since they don’t have to compete with each other for CPU horsepower if they’re both running at the same time.

So now, you can go ahead and create your own set of regular backups!

Now, to restore these directories/files, all you have to do is unzip them on the root of your drive (C:), and they will be automatically placed in the proper directories so long as the folder names remain the same (they may change when you uninstall/reinstall the program(s)).  You can choose to overwrite older files if you wish when you unzip them.  This brings to light the other reason to keep these separate.  If you try to backup everything in one RAR archive, you risk overwriting everything when you go to unzip it.  So, by separating bookmarks and My Documents and whatnot, you can pick and choose what you want to restore.

(Continue to Part III here)

(Originally published on a now-defunct blog)

Create a Simple Backup System

If you’re like most computer users these days, backups are nearly non-existent in your little digital work area.

Here’s something that will take maybe 15 minutes of your time to figure out, which will allow you to backup a good portion (or all; if you want to go that far) of your stuff. The time investment is nil for such a large benefit, so there no excuses! Especially since this will be free, unlike Acronis True Image (which is more than worth the $40-$50, by the way).

So, are you ready? Here we go.

Perhaps you’ve heard of batch (or .bat) files. Perhaps not. Either way, now you have, and they are simply executable files where you can write a whole collection of commands based on the Windows CMD command line. Instead of entering commands one at a time into the command line window, you can put them in a batch file, and a simple double-click on the file will run your little program.

All you need to get started in notepad and WinRar. A shortcut to opening notepad is as follows: Hit the Windows Key and the letter “R” at the same time (Windows+R), and type this in the Run box and hit enter: notepad

This will bring up notepad so you can begin writing your batch file. In order to save a batch file, go to “File” > “Save As”, and type a file name followed by this: .bat

This will create your batch file. Since double clicking on it executes it, right click on it and click “Edit” to open it up in notepad should you happen to close the notepad window.

Now, first type the following at the top of every batch file you create:

@echo off

Next, title your batch file so you know what it is when it runs. Just type “title” followed by whatever you want. Since what I’m going to show you will involve backing up “My Documents”, name it something along those lines.

title My Documents Backup

Next, we’re going to issue a command to copy the entire contents of “My Documents” to a separate location. This is so none of your data gets messed up during the backup procedure and makes sure there aren’t any open files. Just note that the location of your “My Documents” folder may (and will probably) be different, so plug in the directory path you need. If you don’t know where to look, simply do a file search for “My Documents” and copy down the file path in your batch file. So, here’s the command:

XCOPY "C:\Documents and Settings\Adam\My Documents " "C:\backups" /y/s/e/c/i

This will make a copy of the “My Documents” folder in the “backups” folder on your C: drive. If you have a separate or external drive you want to use instead, feel free. The copying process will most likely be a bit faster.

So, the next thing we want to do here is put all the files in a nice, neat little package. And maybe compress everything to save some hard drive space. This is where WinRar comes in. If you’ve never used WinRar, it’s similar to how you use zip files. If you’re not familiar with either, it’s used to compress files to save space for storage, sending over the net, or downloading. Anyway, here’s the command on how to RAR your files:

"C:\Program Files\WinRAR\WinRAR.exe" A -r -M3 -MD4096 -Y -O+ -EP  -ac -isnd -vn -ep1 "C:\backups\my_docs_backup.rar" "C:\backups\My  Documents"

Looks a bit complex, doesn’t it? Let me just break it down.

This is the location of the WinRAR program:

"C:\Program Files\WinRAR\WinRAR.exe"

This tells WinRAR what to do with your files. These are called command switches. They’re quite useful once you learn how to use them, but for our purposes here today, let me just say it tells WinRAR to put your copy of “My Documents” in one file, compress it, and retain the directory structure (this is so when you want to look for something or restore a folder or all folders, it looks exactly like the “My Documents” folder you’re backing up).

A -r -M3 -MD4096 -Y -O+ -EP -ac -isnd -vn -ep1

Next we have the path of where you want to store the compressed (or rather, “RARed”) archive file, plus the .rar file’s name.

"C:\backups\my_docs_backup.rar"

Last, but not least, the path of the folder you are backing up. In this case, it’s the copy of the “My Documents” folder.

"C:\backups\My Documents"

Now, you probably don’t want to keep that extra copy of “My Documents” kicking around on your drive taking up space, so we’re going to have the batch file delete it as soon as it has made the backup:

RMDIR "C:\backups\My Documents" /q/s

…and that’s it! The complete contents of your batch file should look something like this:

@echo off
title My Documents Backup
XCOPY "C:\Documents and Settings\Adam\My Documents " "C:\backups" /y/s/e/c/i
"C:\Program Files\WinRAR\WinRAR.exe" A -r -M3 -MD4096 -Y -O+ -EP  -ac -isnd -vn -ep1 "C:\backups\my_docs_backup.rar" "C:\backups\My  Documents"
RMDIR "C:\backups\My Documents " /q/s

All you have to do now is save the file and run it to see if you managed to follow through on everything correctly. Chances are if this is your first time working with batch files, it won’t run 100% on the first try. You may have to fix a couple things. Since all you’re mainly working with here are the file paths, chances are you typed something in wrong. If you get lost or frustrated at this point, feel free to search with Google, post on the PCM forums, or post in the blog here.

I hope you find this quite useful! If you want a little bit more information on some of the details I merely glossed over, take a look at this: (broken link–original content as follows), or continue to Part II here.

Scheduled Tasks and Batch Files by David Risley (10/23/2003)

Windows has a feature known as Scheduled Tasks which can be quite useful to people. Most people don’t use it because they don’t know how or can’t think of a way to use it. But, I assure you, if your PC is an integral part of your life (as mine is due to my line of work), taking advantage of Scheduled Tasks can do a lot of grunt work for you.

Basically, Scheduled Tasks is a way for Windows users to schedule certain programs to run automatically at certain times of the day. You can do things as simple as start up an application automatically at a certain time. Some people use this to automatically start up their email application before they get to work so that their email is sitting there when they arrive. Scheduled Tasks can also be used to shut down an application after a certain amount of time. The real power of scheduled tasks, though, is recognized when you couple it with custom scripts and batch files.

Now, the non-programmers out there are probably thinking this is too far out of their league to use. But, I assure you it is not. Batch files (files with .BAT extention) are simply files which contain commands that would usually be executed one-by-one via the command line in DOS. You can move files around, delete directories and perform other file operations by command line, and through the use of scheduled tasks, you can do it automatically.

I’ll give you an example that I use. I leave my PC on all the time. Like most people, I tend to be asleep at night. So, things that need to be done but I don’t want to wait for (such as backups) I write batch files for to run them automatically. So, during the week, my PC is fairly busy between the hours of 2AM and 8AM. Every other day, I run a series of batch files which automatically RAR my important files into easily managed RAR archives. (For those of you who don’t know, RAR is a file compression technology similar to ZIP files.) I perform some file operations, and then take advantage of the command line interface of WinRAR to Rar my files into an archive (I will provide the command lines below). Then I use the command line interface to my FTP program to upload the file to a remote location.

So that gives you an example of what you can do with Batch files and Scheduled Tasks. Now let me give you some how-to. Here are a few commands which are useful for file operations:

XCOPY: Used to move entire folders or even entire drives from one location to another. There are many “switches” which can be used on this command. You can view the full reference to the command here (alternate link here). A sample of a command from my batch files is:

XCOPY "F:\pcmech" "E:\Backups\Websites\PCMech" /y /s /e /c /i

This copies the files for PCMech on my PC from one location to another.

RMDIR: Used to remove a directory. I use it in my batch files to clean up after a backup. A reference can be found here.

RMDIR "E:\Backups\Websites" /q /s

COPY: Used to copy a file from one location to another.

COPY /y "fromfile" "tofile"

One other command might be useful. Its available on Windows XP. taskkill is a command which is used to end a Windows process by command line. In batch files used for backups, you might need to use this in order to close a program so as to free the file lock which that program has on its data files. I use it to close down Outlook before I can backup it’s data file. I run another scheduled task later in the morning to re-start Outlook so that my email is there when I sit down at my desk.

Now, for WinRar. WinRAR is a shareware program used to create or uncompress RAR files. It has a Windows interface which most people are accustomed to. But, you can also use it via a command line interface. I use it to create my RAR archives. Most people spend a lot of time trying to get these commands right because it is not very intuitive. I will provide you with my command which hopefully will serve as a helpful reference for people if they care to use this method of backups or file management:

C:\WinRar\RAR.exe A -r -M5 -MD4096 -Y -O+ -PUSER -EP -ac -isnd -vn -ep1 "E:\Backups\backup.rar" "E:\Backups\Backup Files\*.*"

The meaning of many of these command switches is in the WinRar help file. This command will run the RAR.exe file (the command line module to WinRar), create a RAR archive called backup.rar and place into it all of the files and folders located in the “Backup Files” directory. “USER”, in this case, would be the password on the archive.

The purpose of this article is simply to give you something to go by in creating your own batch files and taking advantage of scheduled tasks. I fully realize that some of this might seem too complicated, but I assure you, a little trial and error and playing around with Batch files to do some of these things will teach you how to use them. Believe me, we all flounder around at the beginning to make sure these batch files do what they are intended to do. I spend many hours getting my various batch files to do what I intended them to do. That WinRar command line above took a good friend of mine hours to get right (hopefully my publishing it here will save you some real time).

(Originally published on a now-defunct blog)

Reuse Old Hard Drives

If you’ve had a computer (or computers) for a while, most likely you’ve accumulated a few hard drives through the result of upgrades or friends who couldn’t find a use for old drives.

Now, you might have room in your tower for these extra drives, or you might not.  Or, you might even be using a laptop.  So, what can you do?

It’s simple—get an external drive enclosure.  For about $30-$40, you can get yourself something that you can carry anywhere, use to transfer data between computers (that won’t fit on a USB flash drive), or use to backup some of your stuff.

Here’s some enclosures you can get on newegg (Apricorn and Rosewill being some of the more reliable brands)

Drive enclosures in general now have the option of using SATA or IDE hard drives, and usually come with USB 2.0, eSATA, FireWire 400, and/or FireWire 800.  So, be sure to look at the specs to make sure you’re buying the one that fits your needs.

As a side note, Apricorn drive enclosures that come with EZ Gig II Backup & Disaster Recovery Software is really a rebranded OEM copy of Acronis True Image 8.  The only limitation to this OEM copy is that you can’t image to a network drive; only to an internal or external drive.

(Originally published on a now-defunct blog)

What is the REAL capacity of your drive?

It’s been known for years that the way manufactures tally up hard drive capacity and the way computers tally up capacity are slightly different.  We, as people, use the decimal system to count, as do the manufactures of hard drives.  Computers, on the other hand, use the binary system.

Binary is base 2.  Two states—on or off.  Our regular decimal number system is base 10 (I’m guessing the significance of this has something to do with the number of fingers we have).  Manufacturers count off in base 10 for the sake of simplicity and consistency.  Computers count off in base 2 because of the nature of electricity and how it’s used in all things electronic.

So, when computers calculate the capacity of a hard drive, they count up all the available bytes.  There are 8 bits to a byte.  Bits are either a 1 or a 0.  A byte is the smallest unit of storage available to a computer system, which can store a single ASCII character.

So, the next unit of measurement up from a byte is a kilobyte.  The prefix “kilo” means “1,000”, so when counting in the decimal system, about 1,000 bytes equals 1 kilobyte.  However, since computers run on the binary system, this number is actually 1,024 bytes.

Since the decimal system is in base 10, when you work with exponents in calculations, you must use 10 as a base (in other words, there are 10 different possible states of any one unit—0 to 9).  So, to get a figure of 1,000 bytes, you take 10 and raise it by 3 (10^3).

Since the binary system is base 2, you must use a base of 2 (because there are two possible states of any one unit—0 to 1).  In order to reach the approximate same value as the base 10 decimal system using whole numbers, the base will be raised to the power of 10 (2^10), which will result in 1,024 bytes.

Hopefully this is starting to become clear as to why the discrepancy exists.  When a number system is referred to a base “x” system, the “x” stands for the number of different possible states a digit can be.  In base 10, you can use digits 0,1,2,3,4,5,6,7,8, or 9.  In base 2, you can use digits 0 or 1.  So, in base 10, you are using powers of 10, while in base 2, you are using powers of 2.

In terms of capacity, in order to move up to the next unit of measurement (for example, from byte to kilobyte), powers of 1024 (rather than 1000) are used to calculate capacity.

So, 1,024 bytes = 1 kilobyte.  1,024 kilobytes = 1 megabyte.  1,024 megabytes = 1 gigabyte.  1,024 gigabytes = 1 terabyte.

Referring back to earlier when saying that hard drives determine capacity by counting the number of bytes, this means that the computer recognized a byte as the smallest measurable unit for data storage.  So, since each unit of measurement in increasing magnitude is 1,024 more than the previous measurement of magnitude, you get this:

1 B = 1 byte
1 KB = 2^10 bytes = 1,024 bytes
1 MB =  2^20 bytes = 10,485,76 bytes
1GB = 2^30 bytes = 1,073,741,824 bytes
…and so on.

Who can remember that 1,073,741,824 bytes is 1GB?  I surely can’t.  This is why manufactures find it easier to work with a base 10 system—all the numbers are nice and even!  This is how manufacturers see capacity:

1 B = 1 byte
1 KB = 10^3 bytes = 1,000 bytes
1 MB =  10^6 bytes = 1,000,000 bytes
1GB = 10^9 bytes = 1,000,000,000 bytes
…and so on.

Notice the difference?

So, when a manufacturer advertises an 80GB drive, what they say you’re getting in terms of bytes is 80,000,000,000 bytes.  This, of course, is capacity in terms of the base 10 system.

So, here’s the part you’ve been waiting for…

How to get the real capacity of your hard drive

There are three calculations to perform on the advertised capacity of 80GB.  There are 3 calculations because unit of GB is three orders of magnitude above the unit of B (byte).

So, take the advertised capacity and divide it by 1.024 three times.  If you do this correctly, an advertised capacity of 80GB will yield an actual capacity of 74.5GB (74,505,805,970 bytes)—the total capacity that is usable under a binary number system.

Try this method with large capacity drives, such as 300GB or 320GB.  As you’ll be able to see, you won’t get exactly the capacity advertised. For reference, here’s a list of common drive capacities matched with their actual data capacities (rounded to the nearest hundredths place):

  • 10 GB = 9.31 GB
  • 20 GB = 18.63 GB
  • 30 GB = 27.94 GB
  • 36 GB = 33.53 GB
  • 40 GB = 37.25 GB
  • 60 GB = 55.88 GB
  • 74 GB = 68.91 GB
  • 80 GB = 74.51 GB
  • 100 GB = 93.13 GB
  • 120 GB = 111.76 GB
  • 160 GB = 149.01 GB
  • 180 GB = 167.64 GB
  • 200 GB = 186.26 GB
  • 250 GB = 232.83 GB
  • 300 GB = 279.40 GB
  • 320 GB = 298.02 GB

Yes, this is a little misleading, hence the recent lawsuit against Western Digital for advertising one capacity for a hard drive, and having it show up as a slightly different capacity when used in a computer.  However, this is not the fault of WD, but the fault of the conversion process between the two number systems; similar to the conversion process between the Fahrenheit and Celsius temperature scales.

(Originally published on a now-defunct blog)