In my last blog entry, I wrote the generalized process I had to go through to create an unattended install CD for Windows XP SP2. Today, I’ll go through that in more detail. Before I do, let me point out the site I used as a primary reference: http://unattended.msfn.org/unattended.xp/view/web/1/
Unattended install
The first step I listed was making the Windows installation process fully automated—no annoying “pre-setup” steps.
The First thing I tried was XP SP2’s Deployment Tools, with the following guide: http://unattended.msfn.org/unattended.xp/view/web/7/
Lets just say it would have worked if I was installing XP SP1, but since SP2 comes with additional setup prompts (such as firewall configuration), this tool wasn’t much help. So, then I looked at some of the manual configuration commands and “preconfigured” several setup features, such as allowing the selection of partitions and disk formats (I have a multi-boot system, so I needed the ability to select a specific partition), configuring IE’s pop-up blocker, configuring the firewall, configuring driver source locations, configuring the permissions for a new user account, and turning on the feature that allows automated program installations upon first boot.
For those of you who wonder why many people still use the command line within Linux, this is a good example why that is: The GUI tools did not allow me to configure everything to the point where I needed, so I had to go in an manually add code to the configuration file. GUI overlays for native command line applications often do not provide for every single option you may need, especially if they are 3rd party or overly simplified.
Anyway, I digress.
Slipstreaming the Latest Hotfixes
The next tasked I embarked upon was integrating all the current hotfixes from the last Service Pack up to this month’s regular update cycle. There was a tool called AutoPatcher that I thought I could pull the hotfixes from.
It took me a minute to figure out which AutoPatcher installation files I needed, so to make it easy for you guys, you need the latest Full set (which turned out to be April 2006), followed by the installation of the latest Update set (which turned out to be May 2006).
Next, the hotfixes that I needed were found in these directories:
X:/program files/autopatcher/modules/critical
X:/program files/autopatcher/modules/noncritical
I took a look at the manual way first, but I saw that it involved a lot more time and effort than I was willing to spend on this portion of the project. So, then I took a look at what automated tools were available: http://unattended.msfn.org/unattended.xp/view/web/25/
nLite proved to be quite useful for this step. What I did was since each hotfix was in an individual folder in AutoPatcher’s program directory, I used Windows Explorer to navigate the folders, then to drag-and-drop the *.exe hotfix files into nLite.
There were 4 non-critical hotfix files that caused (or seemed to cause) issues. One was a patch for WMP 10, and since I didn’t have WMP 10 integrated on the CD, which I eventually left out because it caused issues with the native SP2 install of WMP 9 (yes, nLite notifies you that this patch may be questionable to add). There was another hotfix (KB912452) for WMP10 that seemed to cause issues without WMP 10 being installed. nLite did not prompt me about it, and I eventually discovered it and left out. The third hotfix I left out was the “HighMAT CD Writing Wizard”, which was, technically, not really a hotfix patch, but a program update. The last hotfix was some sort of removal tool, which was, again, not really a hotfix patch (and nLite would not allow me to add this one at all).
So, what is my suggestion for others who want to try integrating hotfixes onto their CD? The easiest route would be to only integrate the *critical* hotfixes, and use Windows Update or AutoPatcher for the non-critical patches/hotfixes. It would definitely avoid a few headaches.
Integrating Drivers
This step wasn’t too bad. One thing to keep in mind is that you should number the directories in the order in which you want the drivers to be installed (ie, chipset drivers first, followed by video card drivers down the line). Each directory must also be added to the correct entry in WINNT.SIF file.
Automated Program Installations
This ended up being the most time consuming portion of this whole “unattended install” project. Each program had its nuances, which made it difficult to plow through them one after another. As a result, I didn’t bother to include very many because it would have taken me just as long (or longer) to install the programs manually, as it would to figure out how to install them automatically.
One of the biggest hang-ups I ran into in general was where exactly all these files were supposed to be placed, and how to get them to run. Here’s a list of solutions to all of the “gotcha” moments I bumped into. Hopefully, they’ll be of some use to you.
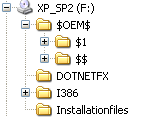
- The $OEM$ directory must be placed in the root directory, alongside the I386 folder, contrary to what several guides said.
- For future reference, in the WINNT.SIF file, under the “[Unattended]” section, you need this line, otherwise the contents of the $OEM$ directory will not be copied to the hard drive: OemPreinstall=Yes
- The RunOnceEx.cmd, and cmdlines.txt files need to be in the $OEM$ directory, and not in subfolders.
- If you create new user accounts, the autologon.reg and useraccounts.cmd files need to be in the $OEM$ directory, and not in subfolders.
- the RunOnceEx.cmd file should only call other .cmd or .reg files. It should *never* try to execute installer files, otherwise they will not be added to the RunOnceEx installation list in the registry.
Onto the programs I setup to install automatically (or rather, tried to):
DirectX 9c
This was somewhat tricky to get to install since there wasn’t much information out about it. However, I was able to find the correct installation switch that allowed it to install silently.
WMP 10
Because of the hotfix issues I had earlier, WMP 10 never ran correctly, so I slipstreamed the critical hotfixes only, and left the non-critical ones to be installed for later. Even afterwards, WMP 10 would not run correctly, and required a reinstallation anyway. So, I ended up leaving this out.
.Net Framework 1.1 SP1 & .Net Framework 2
The unattended installation procedures proved to be somewhat complex and neither ended up installing, even after using RyanVM’s silent installer packages.
As a side note, it is recommended that you install 1.1 before 2.0. You should also note that they are separate frameworks—different applications use each one individually. For instance, nLite required 2.0. Framework 2.0 also required the Windows Installer 3.1 to be installed, which proved to be a hassle to try to slipstream, so I left it alone to save time. Windows XP SP2 comes with Windows Installer 2.0, and nLite was the only program I’ve run across that actually required the newer version (besides the .Net Framework 2.0).
Long story short, unless you have a strong desire or reason to perform an unattended install with the .Net Frameworks, don’t bother because it will take a lot of time to get working correctly, and manually installing these two packages will certainly take far less time.
MS Office 2003
This actually proved to be one of the easiest to prepare, thanks to the Office 2003 Resource Kit Tool and this guide: http://unattended.msfn.org/unattended.xp/view/web/50/
It certainly was nice to have Office install with what I wanted / didn’t want, and without having to sit though the installer process. This was just about the only automated installation that was actually worth my time to walk through.
WinRAR
This was another easy one. There’s not much else to say here about it.
Symantec Antivirus Corporate Ed. 9
This isn’t exactly a run-of-the-mill end-user application that many people would use. There were a few extra instructions to follow, but other than that, it went smoothly.
Overall, I was surprised that a number of things failed to work correctly here. Partly it’s due to poor documentation or contradicting information, partly its my lack of understanding of some of these procedures, and partly…who knows what (I am referring to the issues I had with WMP 10). So, for next time, I think I’ll just do the MS Office installation as an automated installation, and not much else because all I seemed to do was waste a lot of time here (hoping to save some down the road), but it looks like it didn’t work out like that.
Creating the Bootable ISO
This part of the process was fairly easy, thankfully. You can find the guide for it here: http://unattended.msfn.org/unattended.xp/view/web/8/
The CDIMAGE_GUI program is a very nice, easy to use application. The one snag is that some of the buttons don’t actually look like buttons. You will just see free-floating text, especially on the “creation” tab when you’re looking for the “Start Image Creation” button. Once you have your mouse hover over the text, then the button become obvious.
Testing With a Virtual Machine
This step probably saved me a pile of 15 CD-R’s or so. You can find the setup guide here: http://unattended.msfn.org/unattended.xp/view/web/20/
I ended up using Microsoft VirtualPC 2004 over VMware because it looked simplest at a quick glance. That, and there was a 45 day long trial for VirtualPC. I was able to test everything I put on my unattended installation CD ISO with the exception of the integrated drivers, since the virtual machine used generic hardware rather than my own computer’s hardware. Seeing as how useful VirtualPC was, I’m probably going to give VMware a shot to see what it can offer. After all, it’s nice not having to care whether or not you mess up the Operating System when changing settings or installing programs. You can make all the changes you want, then just go back to the beginning (however, for this, you will need something like VMware Player. VMware Workstation and VirtualPC 2004 are the programs that actually create the virtual machine environments).
Configuration Files
Now that I’ve gotten the configuration where everything appears to be working, I decided that some of you may benefit from seeing my configuration files. I will be removing usernames, passwords, CD keys and the like, so these files won’t exactly be able to be run from the get go, but you’ll be able to see how things were put together. First, here’s the directory structure:

Here are the files that go into the $OEM$ folder:
- cmdlines.txt
- RunOnceEx.cmd
- useraccounts.cmd
- autologon.reg
Here are the files that go into the $OEM$/$1/install folder:
- directx.cmd
- Office2003install.cmd
- winRAR.cmd
- sav9.cmd
This file goes into the I386 folder: WINNT.SIF
Download the collection of files here.
Wrapping Things Up
Now it’s come to the point where it’s time to image my drive and install a fresh copy of XP SP2 on my machine. I’ll probably take me 4 or 5 days to actually get all my programs installed and configured. After all, I will have a lot of programs to install, which is why I never reformat willy-nilly.
So, my next blog post will probably come from my fresh shiny new Operating System installation!


 AdamTheTech.com and respective content is Copyright 2003-2026.