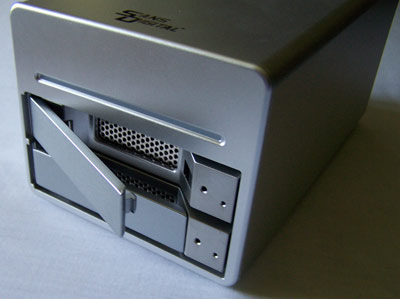
Assembly
To install the drives in the two bays, you will first need to use one of the plastic “keys” provided with the enclosure, and insert it into the matching hole in the front of the bay. Push it in far enough, and the panel will pop out, allowing you to pull out the drive tray. If you happen to lose both plastic “keys”, you can straighten out a paperclip and use that in a pinch.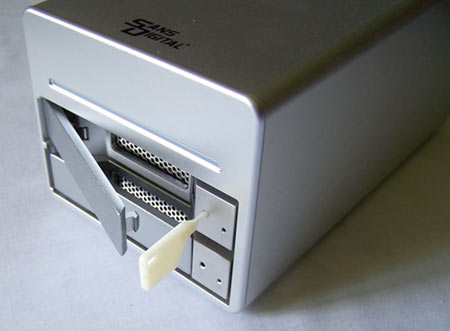 The next step takes the most amount of time in the whole assembly process–putting the drives in the drive trays. The rails on the drive trays are a bit flimsy and are easily bent. However, they are packaged with a plastic tray to help keep them rigid until you’re ready to install the drives. So, all you have to do is remove the four screws holding in the plastic tray protector, then screw the hard drive to the tray’s rails. One thing to note is that the drive’s interface connectors must be facing towards the rear of the tray, and not the front with the bay panel.
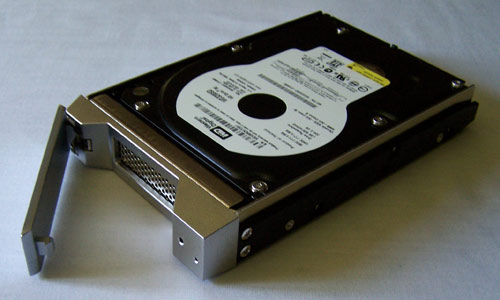 When inserting the drive bay, it needs to be pushed in all the way, and then closed. If you try to force the tray in after the door is closed, it will not go in. Once it is properly installed, the bay locks itself in place to prevent accidental removal.
JBOD vs. RAID 0
On the back of the drive, there is a dip switch setting to set which mode you want (a screwdriver or pen is needed to move the switch). JBOD (Just a Bunch Of Drives) will initialize the two drives as separate drives that will show up as two different drive letters. The two drives that are installed in the enclosure do not need to be identical in this case. Plus, with JBOD, you don’t necessarily need to install two drives. Possibly install one for now, then maybe one later when the space is needed.
With RAID 0 (aka Striping), the capacity of both drives are combined and seen as one single large drive. Note that there is no redundancy with this mode. If one drive dies, the data on both drives will be lost. This is unlike JBOD where if one drive dies, you will still have the other.
For a more in-depth explanation of the differences between the different RAID modes available, please see our RAID guide.
Installation
The installation of the MS2C1 was a cinch when it came to the drivers. In Windows 2000 SP4, XP SP2, and Mac OS X (10.4), the drive enclosure was detected automatically as a disk drive. However, the one downside was that the CD included with the enclosure only contained software for automating backups, and not a formatting/partitioning tool to prepare your drive for use. Under all Operating Systems, this preparation had to be done manually–a step that was buried in one of the multi-language sections of the instructions.
In 2000/XP, you will have to format the drive(s) through 2000/XP’s computer management tool (Control Panel > Administrative Tools > Computer Management). Depending on how large the drive(s) are, this can take anywhere between half an hour to two hours.
In OSX (10.4), you will need to format the drive using OS X’s Disk Utility. If you wish to directly connect the MS2C1 enclosure to both Windows and Mac computers, it must be formatted with FAT32 (Note that there are limitations to FAT32, such as a file size limit of 4GB). If you connect it to a Windows machine and share the drive, then you can format it with NTFS on a Windows machine and OSX will have no problem reading or writing to it over your network. The same goes for instead formatting the drive in HSF+ and sharing the drive in OSX.
As for the CD, it merely contains a piece of backup software that installed smoothly on 2000/XP, but required the serial number that was printed on the CD in OSX. Be sure to copy it down beforehand if you’re using OSX because the Mac will not relinquish the CD until the installation is complete and the unpacked installation file has been dragged into the trash.
Operation
Throughout all testing, the enclosure remained lukewarm to the touch, so heat won’t ever be an issue with this device. The cooling fan in the back of the MS2C1 provides adequate cooling for the two hard drives by pulling air in from the front of the enclosure.
The noise level was also fairly low the entire time. The enclosure muffled the whir and the clicking of the hard drives. The loudest part of the enclosure was the cooling fan, which wasn’t too loud to begin with. Granted, it wasn’t completely silent either, so in a very quiet room where you can hear people whispering, the cooling fan will probably be heard.
Caution!
There are a couple things that this device is not meant to do, so be sure to take note of this. First, do not replace hard drives while the MS2C1 enclosure is still turned on. It does not support hot swapping. The power must be first turned off, otherwise data loss or hardware loss may occur.
Second, once you setup and format the drives, do not change the RAID mode. If you do, data will be lost. So, if you’re sure you want to change modes, make sure you backup everything you wish to save, then delete the partitions, create new partitions, and format them.
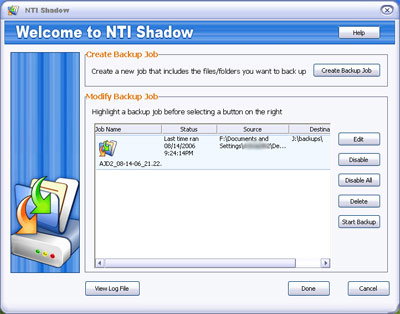
As for the backup software included with the enclosure, NTI Shadow 3 was very intuitive and easy to use. Granted, it is not as robust as Acronis True Image, but it is still a very useful package that will backup selected folders and files manually or automatically. If set to run automatically, it will sit in the system tray, but won’t consume hardly any RAM or resources until actually performing a backup.