
The Nitty-Gritty of SLI AA
nVidia’s antialiasing techniques can be categorized as geometric point sampling in the taxonomy of antialiasing techniques. The specific technique used is referred to as “multisampling”. Sampling is a complex concept which is explained more in depth here (archived page here). Supersampling was the predecessor to multisampling, so there will be references made to it. Traditional supersampling has been more or less abandoned because it was resource intensive, which is the reason for the shift to multisampling.
nVidia’s 8xS and 16x SLI AA modes use both multisampling and a newer form of supersampling. The following charts from nVidia show the sampling techniques and sampling patterns each AA method uses:
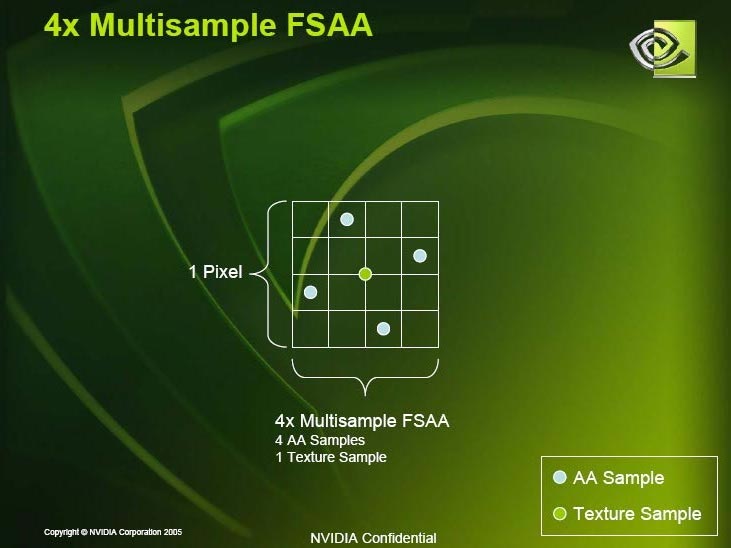 4x AA |
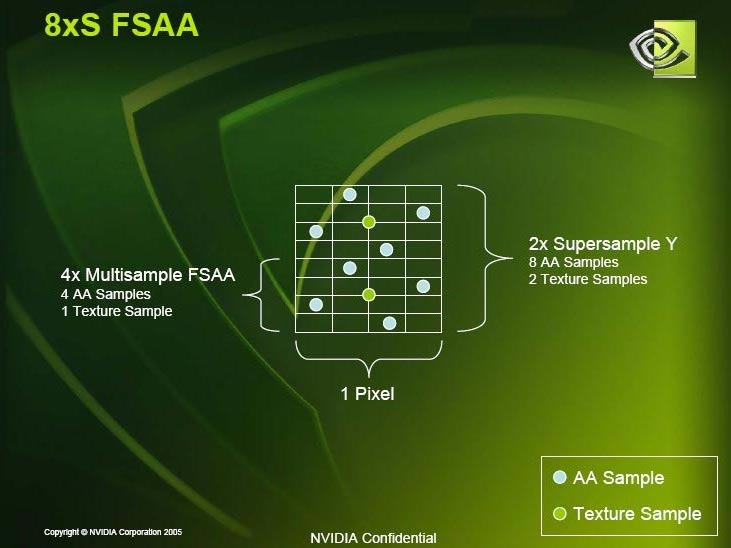 8xS AA |
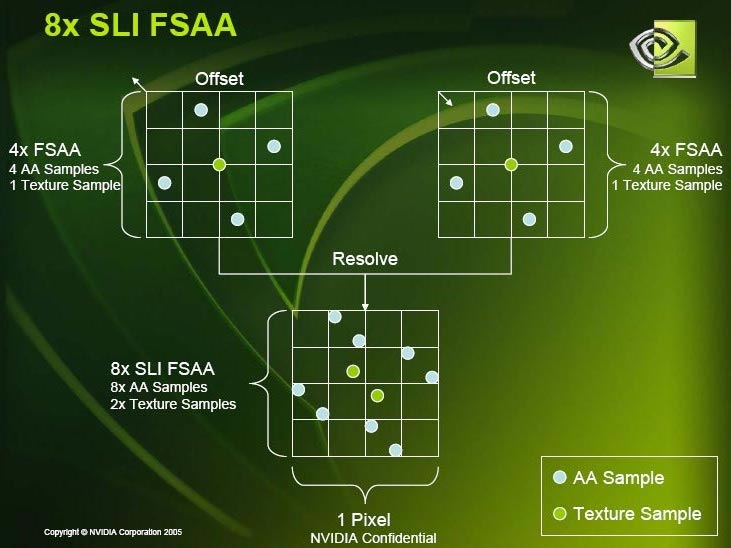 8x SLI AA
|
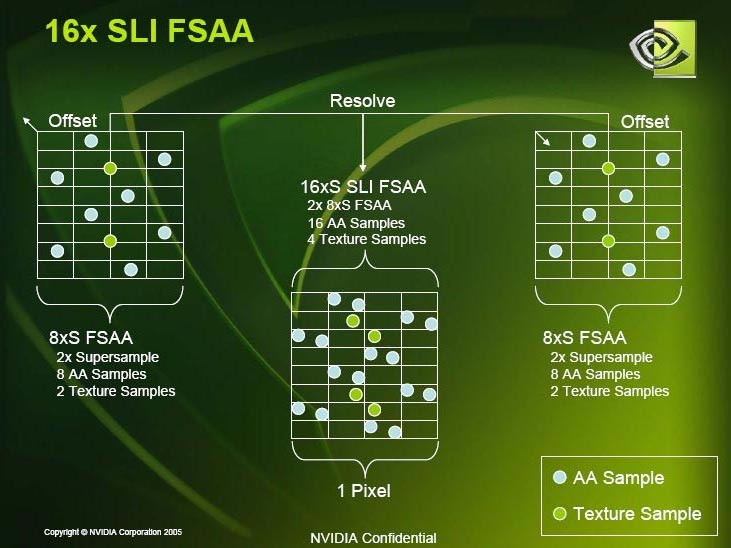 16x SLI AA
|
Put into simpler terms, a single AA sample is merely a given point within a pixel that samples the color at that specific point. It is very similar to the eyedropper color chooser tool that can be found in many graphics program, including Microsoft Paint. A pixel, as most know it, is a single block of color. However, when an image is rendered on a graphics card, the detail of colors is greater than that, so there are even smaller units than a pixel. These base units of a pixel are named “subpixels”.
Since monitors can only display one solid color per pixel, each rendered pixel is sampled to determine a color that averages all the sampled colors. This color will be the one that will fill the pixel and be displayed on the monitor.
Without AA, the sampling mechanism simply chooses a color in the exact center of the pixel and displays whatever color there is at that exact point. This technique is frequently inaccurate, and results in the appearance of jaggies, similar to the circle diagram found earlier in this article. Depending on where the black circle was placed, and where its edge crosses a pixel, a pixel could either be solid black or solid white.
Multisampling is the act of taking many discrete sample points within a pixel in order to better estimate the final color that the pixel should be. So, if the circle has been placed so that a small portion of itself is within a pixel, multiple sample points will pick up on this fact and average the final pixel color accordingly. All in all, the more sample points there are, the better the color estimate, and the smoother the image.
The texture sample is the final blended base color of a sampled pixel. The significance of a texture sample is to help speed along the process of pixel shading. Pixel shading helps render volumetric lighting, smoke and fog effects, metallic surfaces, as well as smooth 3D objects. Basically, when the base color of the pixel is determined, complements of multisampling, only one set of shader data is sent for all the samples within that pixel. If traditional supersampling was being used, every sample would be sending its shader data down the pipeline to individually execute the pixel shader. This process taxes resources quite heavily. With multisampling, the act of only sending one set of data per pixel reduces the amount of caching and buffering needed for antialiasing, thus increasing performance.
However, similar to the advantage that larger numbers of samples per pixel have in antialiasing, multiple texture samples per pixel also go to improve on quality because they offer a better color estimate. This is why 8xS AA returns a better antialiased image and SLI 8xAA. The presence of two texture samples per pixel in 8xS AA is also the reason why the Y-Axis of a pixel in 8xS AA is labeled as “2x Supersampling Y.” One caveat, though: while more than one texture sample can be beneficial, too many of them will hurt overall performance of the AA method, as seen with traditional supersampling.
Video card manufactures can choose what kinds of patterns algorithms that the individual antialiasing settings use. These algorithms are determined solely by the manufactueres. Video game producers do not have access to these algorithms from their games.
Broken down in terms of sampling, nVidia begins with 4x AA, which turns out to be the building block for all the other AA modes. 4xAA is actually composed of 4 individual AA samples. Note that nVidia displays their sampling pattern in grid form, as pictured earlier. The boxes that are displayed are not subpixels, but just an easier and more visible means of displaying the sampling pattern.
8xS AA is really two 4x AA multisample blocks stacked vertically in the Y-Axis of a single pixel to produce a “2x Supersample Y” block (the “Y” identifies the axis). The X-Axis remains as a 4xAA multisample pattern.
8x SLI AA is different in that it takes the 4x AA multisampling pattern, offsets each sampling pattern on the separate GPUs in order to avoid covering or overlapping the patterns, then blends them together so they complement each other. This produces the effect of a higher antialiased image.
16x SLI is even more complex than 8x SLI AA because it uses two offset 8xS AA sampling patterns. As you can see in the mess of dots, it looks pretty random. The human eye is quite adept at finding patterns in images, so the idea is to discourage the appearance of patterns to make for a more realistic and natural image.
Multisampling is a non-uniform sampling method (almost randomized, but controlled within reason) that eliminates nearly all aliasing, but instead returns noise in areas where there are highly distorted geometric shapes. Non-uniform sampling is preferred because repeating and uniform sampling patterns reproduce a form of aliasing that completely destroys the effect of perspective in 3D objects when the angle of a surface is distant and/or at an extreme angle. This is part of the reason why a single pattern is doubled up and offset on each GPU under SLI AA. When the two images are blended together, an even more apparently random sampling is produced in the image, not to mention a smoother looking image because of the high number of samples per pixel.
The number of samples per pixel increases as the AA mode is increased. Although images looks better as the number of samples per pixel increases, non-uniform sampling results in image noise and blurring becomes increasingly apparent the closer you get to the image horizon, where shape distortion is more dominating. Examples of this effect can be found here (archived page here).
This is where AF (Anisotropic Filtering) comes in. AF cleans up the noise and blurring effect left behind by AA. The higher the level of AF that is being applied, the clearer the representation of textures that will appear. Although it looks better the higher it goes, there is a price and a drawback. The price of increasingly higher levels of AF is that there is a higher strain placed on the video card, thus taking a larger the bite out of performance. The draw back with higher AF levels is that the clarity of distant textures may appear unrealistically high. With a bit of tweaking, the right balance can be achieved.
So, basically, AA reduces the “jaggies”, while AF cleans up the blurring as a side effect of “jaggy” reduction. Both AA and AF can be combined to produce images with both smooth outlines and crisp surfaces to generate a more photorealistic image. It’s quite the marriage of techniques.